自动布局是一种基于约束规则的 UI 布局方式,可以根据视图之间的关系自动调整它们在屏幕上的位置和大小。它支持各种屏幕尺寸和设备方向的适配,而且能够很好地处理复杂的布局需求。与传统的手动布局相比,自动布局更加灵活、可维护性更高,也更加适合多人协作开发。
在自动布局中,每个视图都会有一组约束条件,用来描述它与其他视图之间的关系。这些约束条件通常包括视图的位置、大小、间距等信息。通过这些约束条件,系统就可以计算出每个视图应该具有的最佳尺寸和位置,并自动调整它们的布局。
Auto Layout 基础知识
视图层次结构
在 Auto Layout 技术中,所有视图都位于一个视图层次结构中,其中每个视图都有一个父视图和零个或多个子视图。父视图用于确定其子视图的位置,大小和其他属性。对于任何给定的视图,可以使用其父视图的坐标系进行定位,该坐标系通常称为坐标空间。
基本概念
- 约束:自动布局的核心就是约束,在 iOS 中约束指的是把一个视图的位置、大小、间距等属性与其他视图或父视图相联系的规则。这些规则通过约束条件来描述,然后由自动布局系统来计算和应用。
- 参照视图:参照视图是指我们用来描述约束关系的视图,可以是视图本身,也可以是父视图或其他的兄弟视图。在 NSLayoutAnchor 中,anchor view 通常使用
UIView的实例来表示。 - 锚点:锚点是 anchor view 上的某个属性,比如视图的顶部、底部、左边、右边等。锚点可以用来建立约束关系,让一个视图的某个属性相对于另外一个视图的某个属性有一定的距离或比例关系。
- 关系运算符:关系运算符用来描述两个锚点之间的关系,比如等于
(==)、大于等于(>=)、小于等于(<=)等。 - 偏移量:偏移量指的是两个锚点之间的具体距离或比例值,可以是一个固定的数值或者是一个百分比。
约束条件
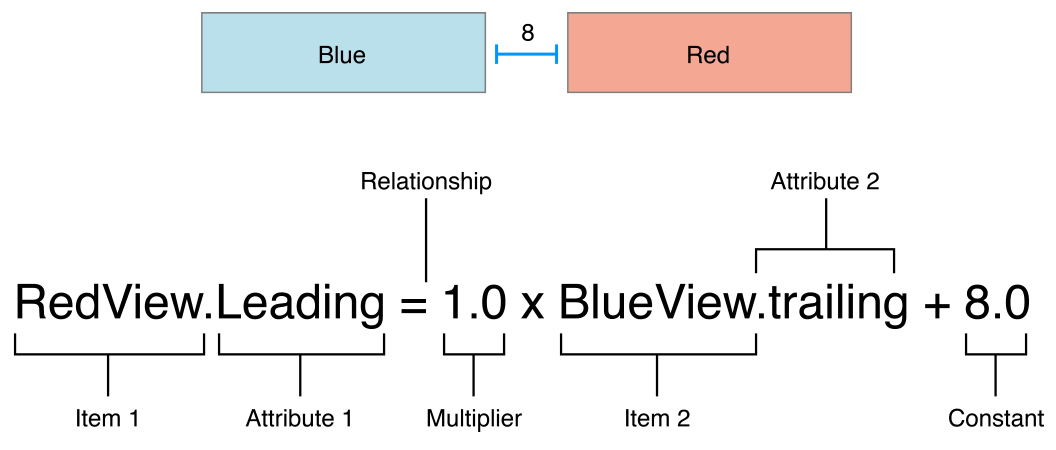
自动布局中的约束条件通常由 NSLayoutConstraint 类表示,它包含以下几个属性:
- firstItem:第一个参与约束的视图。
- firstAttribute:第一个参与约束的视图的属性。
- relation:约束关系,如等于、大于等等。
- secondItem:第二个参与约束的视图,如果没有则为 nil。
- secondAttribute:第二个参与约束的视图的属性,如果没有则为 notAnAttribute。
- multiplier:乘数,对第一个参与约束的视图属性进行缩放。
- constant:常量,对参与约束的属性进行偏移。
属性与参照系
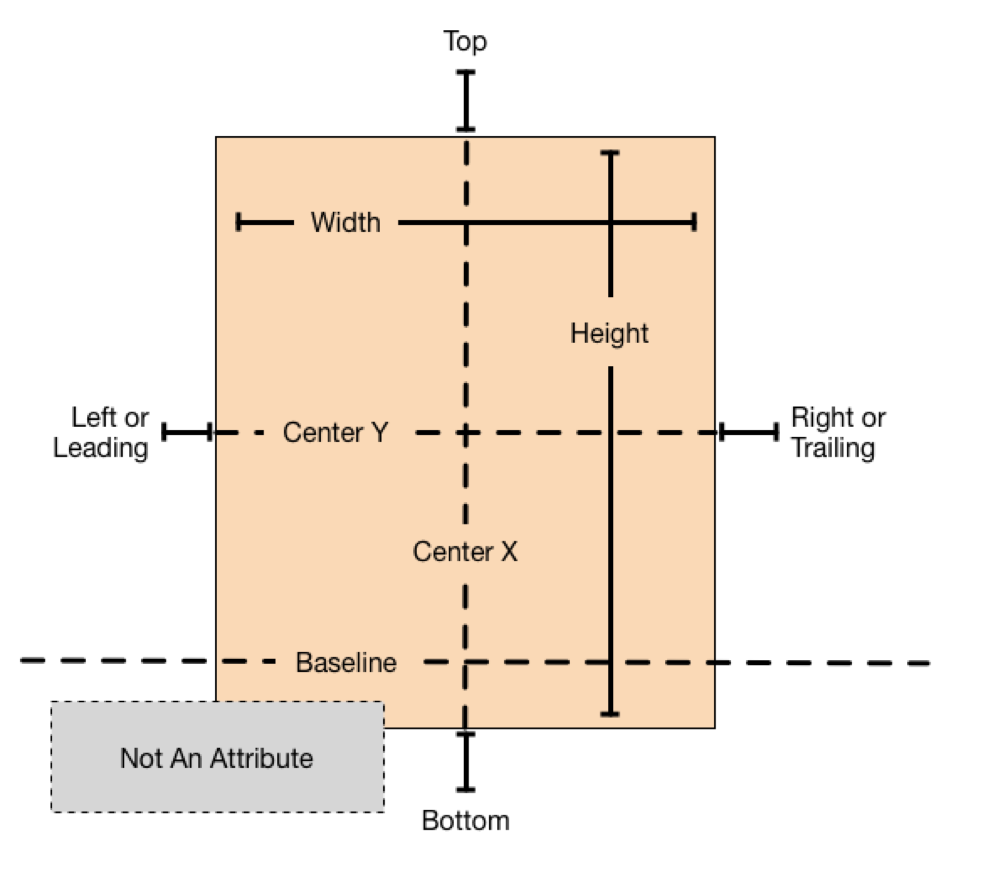
在自动布局中,UIView 提供了一些特定的属性,用来描述视图与其父视图之间的关系。这些属性通常以 NSLayoutAttribute 枚举类型表示,包括:
-
属性:
- NSLayoutAttributeLeft/Leading:视图左边距离父视图左边/前导边的距离。
- NSLayoutAttributeRight/Trailing:视图右边距离父视图右边/后继边的距离。
- NSLayoutAttributeTop:视图顶部距离父视图顶部的距离。
- NSLayoutAttributeBottom:视图底部距离父视图底部的距离。
- NSLayoutAttributeWidth:视图宽度。
- NSLayoutAttributeHeight:视图高度。
- NSLayoutAttributeCenterX:视图水平中心距离父视图水平中心的距离。
-
NSLayoutAttributeCenterY:视图垂直中心距离父视图垂直中心的距离。
-
参照系:
- superview:视图所在的父视图。
- safeAreaLayoutGuide:安全区域。
- layoutMarginsGuide:布局边距区域。
约束优先级
在多个约束条件同时存在时,系统需要确定它们之间的优先级,以决定如何计算视图的布局。约束条件的优先级范围是 0~1000,默认值是 UILayoutPriorityRequired(1000),越大的优先级越高。我们可以使用 NSLayoutConstraint 的 priority 属性来设置约束优先级。
1
2
3
4
5
6
7
8
NSLayoutConstraint *constraint = [NSLayoutConstraint constraintWithItem:view1
                                        attribute:NSLayoutAttributeLeading
                                        relatedBy:NSLayoutRelationEqual
                                           toItem:view2
                                        attribute:NSLayoutAttributeTrailing
                                       multiplier:1.0
                                         constant:10.0];
constraint.priority = UILayoutPriorityDefaultHigh;
约束冲突
当存在多个约束条件时,可能会出现冲突情况,即无法同时满足所有约束条件。此时,系统会选择其中一个约束条件作为“牺牲品”,放弃该约束条件的限制,以满足其他约束条件。我们可以通过 UIView 的 constraintsAffectingLayoutForAxis:方法查看某个方向上影响布局的所有约束条件。
1
2
NSArray<NSLayoutConstraint *> *constraints = [view constraintsAffectingLayoutForAxis:UILayoutConstraintAxisHorizontal];
NSLog(@"Horizontal constraints: %@", constraints);
VFL 语言
Visual Format Language(VFL)是一种表达式语言,可以通过字符串的形式来描述约束条件。它简化了创建约束条件的过程,可以使代码更加简洁易读。下面代码演示了如何使用 Auto Layout 在一个视图中排列两个标签和一个按钮:
1
2
3
4
5
6
7
8
9
10
11
12
13
14
15
16
17
18
19
20
21
22
23
24
25
26
UILabel *label1 = [[UILabel alloc] init];
[label1 setText:@"Label 1"];
[label1 setTranslatesAutoresizingMaskIntoConstraints:NO];
[self.view addSubview:label1];

UILabel *label2 = [[UILabel alloc] init];
[label2 setText:@"Label 2"];
[label2 setTranslatesAutoresizingMaskIntoConstraints:NO];
[self.view addSubview:label2];

UIButton *button = [UIButton buttonWithType:UIButtonTypeSystem];
[button setTitle:@"Button" forState:UIControlStateNormal];
[button setTranslatesAutoresizingMaskIntoConstraints:NO];
[self.view addSubview:button];

NSDictionary *viewsDictionary = NSDictionaryOfVariableBindings(label1, label2, button);

NSArray *constraints = [NSLayoutConstraint constraintsWithVisualFormat:@"V:|-50-[label1]-[label2]-50-[button]-|" options:0 metrics:nil views:viewsDictionary];
[self.view addConstraints:constraints];

constraints = [NSLayoutConstraint constraintsWithVisualFormat:@"H:|-[label1]-[button]-|" options:NSLayoutFormatAlignAllCenterY metrics:nil views:viewsDictionary];
[self.view addConstraints:constraints];

constraints = [NSLayoutConstraint constraintsWithVisualFormat:@"H:|-[label2]-|" options:0 metrics:nil views:viewsDictionary];
[self.view addConstraints:constraints];
NSLayoutAnchor
NSLayoutAnchor类是iOS 9及更高版本中引入的一种新方式,用于创建和管理自动布局约束条件。它们提供了一种类型安全,简洁和易于理解的API,使得编写自动布局代码变得更加容易。
1
2
// view1的前导边缘等于view2的后缘边缘加上10像素的距离
[view1.leadingAnchor constraintEqualToAnchor:view2.trailingAnchor constant:10.0].active = YES;
Multiplier
Multiplier是一个乘数,可以用来定义两个锚点之间的比例关系。例如,如果我们想让一个视图的宽度是另一个视图宽度的一半,可以使用以下代码:
1
[view1.widthAnchor constraintEqualToAnchor:view2.widthAnchor multiplier:0.5].active = YES;
Priority
Priority是约束的优先级,用来定义约束的重要程度。在自动布局系统中,如果存在多个约束条件,那么就需要通过优先级来决定哪些约束会被满足以及满足的顺序。默认情况下,所有的约束都具有相同的优先级(UILayoutPriorityRequired)。
我们可以使用以下代码来设置约束的优先级:
1
[view1.widthAnchor constraintEqualToConstant:100.0].priority = UILayoutPriorityDefaultHigh;
NSLayoutDimension
NSLayoutDimension是NSLayoutAnchor的子类,它专门用来描述视图的尺寸属性。NSLayoutDimension提供了一组API来方便我们设置视图的尺寸大小。
| API | 作用 |
|---|---|
constraintEqualToConstant: |
约束尺寸等于常数 |
constraintGreaterThanOrEqualToConstant: |
约束尺寸大于等于常数 |
constraintLessThanOrEqualToConstant: |
约束尺寸小于等于常数 |
anchorWithOffsetToAnchor: |
获取当前锚点与另一个锚点之间的距离锚点 |
NSLayoutAnchor提供了一组API来方便我们设置约束。我们可以使用这些API来获取一个anchor point,然后通过相关的方法来设置约束条件。通过获取这些anchor point,我们就可以使用相关的方法来设置约束条件。下面是一些常用的API及其作用:
| API | 作用 |
|---|---|
topAnchor |
获取视图的顶部锚点 |
bottomAnchor |
获取视图的底部锚点 |
leftAnchor |
获取视图的左边锚点 |
rightAnchor |
获取视图的右边锚点 |
leadingAnchor |
获取视图的首部锚点,通常与leftAnchor相同 |
trailingAnchor |
获取视图的尾部锚点,通常与rightAnchor相同 |
widthAnchor |
获取视图的宽度锚点 |
heightAnchor |
获取视图的高度锚点 |
centerXAnchor |
获取视图的水平中心锚点 |
centerYAnchor |
获取视图的垂直中心锚点 |
UILayoutGuide
UILayoutGuide是在iOS 9中引入的,它是一个虚拟的占位对象,可以在使用Auto Layout进行布局时帮助开发者更加灵活地组织视图之间的约束关系。
在实际的布局中,经常会遇到这样一些情况,例如两个控件之间有一段间距,因横竖屏切换以及屏幕大小不等,这个间距大小不固定;或者需要将两个控件成组后居中。此类场景下,我们可以通过添加一个虚拟的UIView来实现布局,但是这样会增加不必要的视图层级,影响性能并且可能会导致事件路由问题。
UILayoutGuide的出现就是为了解决这些问题。它可以被添加到视图中,与普通的视图一样参与布局,但是不会渲染出来,也不会响应事件路由。因此,开发者可以更加灵活地组织布局,并减少不必要的视图层级。
除此之外,UILayoutGuide还有一个优点,即可以作为一种抽象的概念来帮助开发者更好地理解和描述布局。例如,我们可以创建一个UILayoutGuide来表示一个视图的底部,这样我们就可以将多个视图与该UILayoutGuide相对齐,从而使布局更加清晰和易于维护。
Auto Layout与Safe Area
在iOS11中,苹果引入了Safe Area的概念。Safe Area是指一个视图内部的“安全区域”,即保证内容不被遮挡的区域。在Auto Layout中,我们应该使用Safe Area来进行布局,以避免出现布局错乱或者被遮挡的情况。下面是一个使用Safe Area实现垂直方向两个视图等高等宽并且距离父视图边缘各20px的例子:
1
2
3
4
5
6
7
8
9
10
11
12
13
14
if (@available(iOS 11.0, *)) {
    UILayoutGuide *layoutGuide = self.view.safeAreaLayoutGuide;
    [view1.topAnchor constraintEqualToAnchor:layoutGuide.topAnchor constant:20].active = YES;
    [view1.leadingAnchor constraintEqualToAnchor:layoutGuide.leadingAnchor constant:20].active = YES;
    [view1.trailingAnchor constraintEqualToAnchor:view2.leadingAnchor constant:-20].active = YES;
    [view1.heightAnchor constraintEqualToAnchor:view2.heightAnchor].active = YES;

    [view2.topAnchor constraintEqualToAnchor:view1.bottomAnchor constant:20].active = YES;
    [view2.leadingAnchor constraintEqualToAnchor:layoutGuide.leadingAnchor constant:20].active = YES;
    [view2.trailingAnchor constraintEqualToAnchor:layoutGuide.trailingAnchor constant:-20].active = YES;
    [view2.bottomAnchor constraintEqualToAnchor:layoutGuide.bottomAnchor constant:-20].active = YES;
} else {

}
自定义视图和自定义布局
在实际开发中,我们可能需要创建一些自定义视图,并对其进行自定义布局。下面是一个自定义视图并使用自定义布局来控制其位置和大小的例子:
1
2
3
4
5
6
7
8
9
10
11
12
13
14
15
16
17
18
19
20
21
22
23
24
25
26
@interface CustomView : UIView

@end

@implementation CustomView

- (instancetype)initWithFrame:(CGRect)frame {
    self = [super initWithFrame:frame];
    if (self) {
        self.backgroundColor = [UIColor redColor];
    }
    return self;
}

+ (BOOL)requiresConstraintBasedLayout {
    return YES;
}

- (void)updateConstraints {
    [super updateConstraints];

    [self.widthAnchor constraintEqualToConstant:100].active = YES;
    [self.heightAnchor constraintEqualToConstant:100].active = YES;
}

@end
在上述例子中,我们创建了一个名为CustomView的自定义视图,并通过实现updateConstraints方法来创建其布局约束条件,使得该视图宽度和高度均为100。在使用自定义视图时,我们可以将其添加到一个容器视图中,并设置容器视图的布局约束条件,以控制自定义视图的位置和大小:
1
2
3
4
CustomView *customView = [[CustomView alloc] init];
[self.view addSubview:customView];
[customView.leadingAnchor constraintEqualToAnchor:self.view.leadingAnchor constant:20].active = YES;
[customView.topAnchor constraintEqualToAnchor:self.view.topAnchor constant:20].active = YES;
示例代码
下面代码实现一个简单的注册登录页面,适配横竖屏切换。通过NSLayoutAnchor实现子视图间的相互约束,并设置了子视图最小尺寸。
1
2
3
4
5
6
7
8
9
10
11
12
13
14
15
16
17
18
19
20
21
22
23
24
25
26
27
28
29
30
31
32
33
34
35
36
37
38
39
40
41
42
43
44
45
46
47
48
49
50
51
52
53
54
55
56
57
58
59
60
61
62
63
64
65
66
67
68
69
70
71
72
73
74
75
76
77
78
79
80
81
82
83
84
85
86
87
88
89
90
91
92
93
94
95
96
97
98
99
#import "ViewController.h"

@interface ViewController ()

@property (nonatomic, strong) UIImageView *avatarImageView;
@property (nonatomic, strong) UITextField *usernameTextField;
@property (nonatomic, strong) UITextField *passwordTextField;
@property (nonatomic, strong) UIButton *loginButton;
@property (nonatomic, strong) UIButton *registerButton;

@end

@implementation ViewController

- (void)viewDidLoad {
    [super viewDidLoad];

    self.view.backgroundColor = [UIColor whiteColor];

    // 创建头像视图
    self.avatarImageView = [[UIImageView alloc] init];
    self.avatarImageView.translatesAutoresizingMaskIntoConstraints = NO;
    self.avatarImageView.image = [UIImage imageNamed:@"avatar.png"];
    self.avatarImageView.contentMode = UIViewContentModeScaleAspectFit;
    [self.view addSubview:self.avatarImageView];

    // 创建账号输入框
    self.usernameTextField = [[UITextField alloc] init];
    self.usernameTextField.translatesAutoresizingMaskIntoConstraints = NO;
    self.usernameTextField.placeholder = @"请输入账号";
    self.usernameTextField.borderStyle = UITextBorderStyleRoundedRect;
    [self.view addSubview:self.usernameTextField];

    // 创建密码输入框
    self.passwordTextField = [[UITextField alloc] init];
    self.passwordTextField.translatesAutoresizingMaskIntoConstraints = NO;
    self.passwordTextField.placeholder = @"请输入密码";
    self.passwordTextField.borderStyle = UITextBorderStyleRoundedRect;
    self.passwordTextField.secureTextEntry = YES;
    [self.view addSubview:self.passwordTextField];

    // 创建登录按钮
    self.loginButton = [[UIButton alloc] init];
    self.loginButton.translatesAutoresizingMaskIntoConstraints = NO;
    [self.loginButton setTitle:@"登录" forState:UIControlStateNormal];
    [self.loginButton setTitleColor:[UIColor blackColor] forState:UIControlStateNormal];
    [self.loginButton setBackgroundColor:[UIColor blueColor]];
    [self.view addSubview:self.loginButton];

    // 创建注册按钮
    self.registerButton = [[UIButton alloc] init];
    self.registerButton.translatesAutoresizingMaskIntoConstraints = NO;
    [self.registerButton setTitle:@"注册" forState:UIControlStateNormal];
    [self.registerButton setTitleColor:[UIColor blackColor] forState:UIControlStateNormal];
    [self.registerButton setBackgroundColor:[UIColor greenColor]];
    [self.view addSubview:self.registerButton];

    // 安全区域布局指南
    UILayoutGuide *safeAreaLayoutGuide = self.view.safeAreaLayoutGuide;

    // 头像视图约束
    CGFloat avatarSize = MIN(CGRectGetWidth(self.view.frame), CGRectGetHeight(self.view.frame)) * 0.3;
    [self.avatarImageView.centerXAnchor constraintEqualToAnchor:safeAreaLayoutGuide.centerXAnchor].active = YES;
    [self.avatarImageView.topAnchor constraintEqualToAnchor:safeAreaLayoutGuide.topAnchor constant:50.0].active = YES;
    [self.avatarImageView.widthAnchor constraintEqualToConstant:avatarSize].active = YES;
    [self.avatarImageView.heightAnchor constraintEqualToConstant:avatarSize].active = YES;

    // 账号输入框约束
    CGFloat textFieldWidth = CGRectGetWidth(self.view.frame) * 0.8;
    [self.usernameTextField.leadingAnchor constraintEqualToAnchor:safeAreaLayoutGuide.leadingAnchor constant:(CGRectGetWidth(self.view.frame)-textFieldWidth)*0.5].active = YES;
    [self.usernameTextField.trailingAnchor constraintEqualToAnchor:safeAreaLayoutGuide.trailingAnchor constant:-(CGRectGetWidth(self.view.frame)-textFieldWidth)*0.5].active = YES;
    [self.usernameTextField.topAnchor constraintEqualToAnchor:self.avatarImageView.bottomAnchor constant:30.0].active = YES;
    [self.usernameTextField.heightAnchor constraintEqualToConstant:40.0].active = YES;

    // 密码输入框约束
    [self.passwordTextField.leadingAnchor constraintEqualToAnchor:safeAreaLayoutGuide.leadingAnchor constant:(CGRectGetWidth(self.view.frame)-textFieldWidth)*0.5].active = YES;
    [self.passwordTextField.trailingAnchor constraintEqualToAnchor:safeAreaLayoutGuide.trailingAnchor constant:-(CGRectGetWidth(self.view.frame)-textFieldWidth)*0.5].active = YES;
    [self.passwordTextField.topAnchor constraintEqualToAnchor:self.usernameTextField.bottomAnchor constant:20.0].active = YES;
    [self.passwordTextField.heightAnchor constraintEqualToConstant:40.0].active = YES;

    // 登录按钮约束
    CGFloat buttonWidth = CGRectGetWidth(self.view.frame) * 0.4;
    [self.loginButton.leadingAnchor constraintEqualToAnchor:safeAreaLayoutGuide.leadingAnchor constant:(CGRectGetWidth(self.view.frame)-2*buttonWidth)/3.0].active = YES;
    [self.loginButton.widthAnchor constraintEqualToConstant:buttonWidth].active = YES;
    [self.loginButton.topAnchor constraintEqualToAnchor:self.passwordTextField.bottomAnchor constant:30.0].active = YES;
    [self.loginButton.bottomAnchor constraintEqualToAnchor:safeAreaLayoutGuide.bottomAnchor constant:-30.0].active = YES;
    [self.loginButton.heightAnchor constraintEqualToConstant:40.0].active = YES;


    // 注册按钮约束
    [self.registerButton.trailingAnchor constraintEqualToAnchor:safeAreaLayoutGuide.trailingAnchor constant:-(CGRectGetWidth(self.view.frame)-2*buttonWidth)/3.0].active = YES;
    [self.registerButton.widthAnchor constraintEqualToConstant:buttonWidth].active = YES;
    [self.registerButton.topAnchor constraintEqualToAnchor:self.passwordTextField.bottomAnchor constant:30.0].active = YES;
    [self.registerButton.bottomAnchor constraintEqualToAnchor:safeAreaLayoutGuide.bottomAnchor constant:-30.0].active = YES;
    [self.registerButton.heightAnchor constraintEqualToConstant:40.0].active = YES;

}

@end